This Quick Tips post is the second in the series on age estimation on skeletal remains, if you haven’t read the previous post click here. The previous post provides an overview of the different techniques utilised by archaeologists/anthropologists, which will each be covered in more detail in their own blog post, and the categories that human skeletal remains are placed under according to their chronological age.
One of the methods frequently used by archaeologists/anthropologists to estimate the chronological age of human remains is by studying the level of epiphyseal fusions.
But first what is an epiphysis? An epiphysis is the cap at the end of a long bone that develops from a secondary ossification center. Over the course of adolescence the epiphysis, which is originally separate, will fuse to the diaphysis. The ages of which epiphyseal fusion begins and ends are very well documented, with the majority of epiphyseal activity taking place between the ages of fifteen and twenty-three.

Diagram showing where the epiphysis is found.
As epiphyseal fusions are progressive they are often scored as either being unfused (non-union), united, and fully fused (complete union). Females often experience the union of many osteological elements before males, and every individual experience epiphyseal union at different ages.

Left: Diagram of a skeleton showing the position of the different epiphyseal elements.
Right: A graph displaying the timing of fusion of epiphyses for various for various human osteological elements. The grey horizontal bars depict the period of time, in ages, when the fusion is occurring. All of the data is representative of males, except where it is noted. Data taken from Buikstra & Ubelaker, 1994.
Archaeologists/anthropologists use standards that are well known and documented, such as Buikstra & Ubelaker’s (1994) depicted in the above graph. From the above data we know that, for example, the fusion of the femur head to the lesser trochanter is begins around the age of fifteen and a half and ends around the age of twenty. So if a skeleton has evidence of an unfused femur head/lesser trochanter, there is a possibility of the skeleton having a chronological age of < fifteen years. If there is full union of the epiphyses then the skeleton is more than likely being > twenty years old. But it should be noted that individuals vary in their development so numerous elements should be examined before coming to an accurate conclusion.
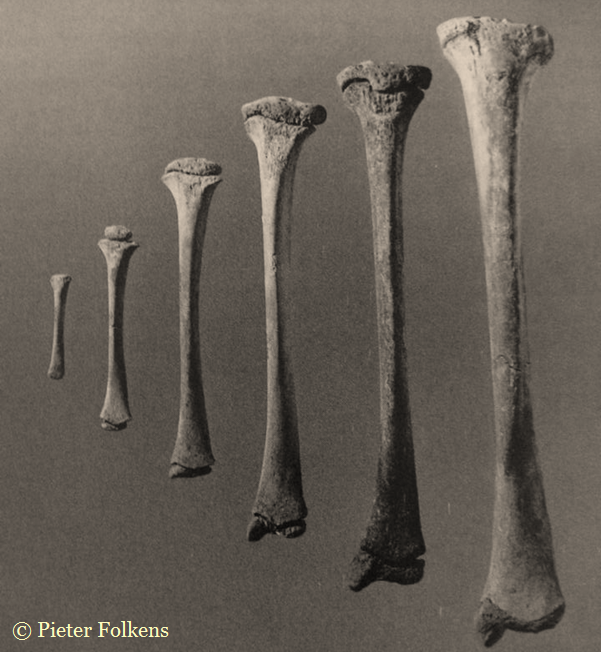
Different stages of epiphysis fusion of human tibias. Ages left to right: Newborn, 1.6 years old, six years old, ten years old, twelve years old and eighteen years old.
As several elements of the human skeleton begin the stages of epiphyseal fusion alongside the conclusion of tooth eruption, these two techniques (dentition and epiphyseal closure) are often used complementary to each other to help age sub-adults. The next post in this series on age estimation will focus on the use of dentition to aid with the chronological ageing of human remains.
References:
Buikstra, J.E., Ubelaker, D.H. 1994. Standards for Data Collection From Human Skeletal Remains. Fayetteville, Arkansas: Arkansas Archaeological Survey Report Number 44.
White, T.D., Folkens, P.A. 2005. The Human Bone Manual. San Diego, CA: Academic Press. Pg 360-385.
This is the second of a Quick Tips series on ageing skeletal remains, the next in this series will focus on the dentition method of ageing sub-adults. To read more Quick Tips in the mean time, click here!
To learn about basic fracture types and their characteristics/origins click here!