Quick Tips: Archaeological Techniques – Aerial Photography.

Aerial photography is a surveying technique that involves taking a photographic record from satellites, aircrafts and balloons, to aid with the detection of buried archaeological remains and features, which may be difficult to identify at ground level.

There are two types of aerial photography;

  • Oblique – Oblique aerial photography involves taking a photograph from lower altitudes at an angle. This gives a better perspective and a pictorial effect, and allows for identification of earthworks.
  • Vertical – Vertical aerial photography involves taking a photograph from great heights directly above an area. This gives a bird’s eye view of an area, allowing for easier map making and identification of crop marks.
aerialphoto

Fig. 1: There are two types of aerial photography; oblique and vertical.

These aerial photographs can show numerous phenomena, some of which are sometimes not from archaeological origins. These phenomena include:

  • Crop marks – These types of marks develop when a buried wall or ditch increases or decreases crop growth; this is due to the feature affecting the availability of moisture and nutrients in the soil.
crop mark

Fig 2. An example of a crop mark. You can see in the excavation site the ditch that is affecting the crop’s growth.

  • Soil marks – These marks are caused by changes in the subsoil colour, when a plough brings part of the buried feature to the surface.
Fig. 3: After this field was ploughed, it has exposed the feature which has had parts brought to the surface.

Fig. 3: An example of soil marks. After this field had been ploughed, this buried feature had parts brought to the surface which has caused discolouration in the soil.

  • Earthworks – This phrase is used to describe any features seen in relief. These are also known as shadow marks when viewed from the air.
Fig. 4: This is an example of an earthwork. This particular archaeological site is an abandoned Medieval settlement.

Fig. 4: This is an example of an earthwork. This particular archaeological site is an abandoned Medieval settlement.

It is from these phenomena that we’re able to identify whether there is buried archaeology in an area which can then allow for an in-depth investigation.

References:

Balme, J., Paterson, A. 2006. Archaeology in Practice: A Student Guide to Archaeological Analayses. Oxford, UK: Blackwell Publishing. Pg 218.

Renfrew, C., Bahn, P. 1991. Archaeology: Theories, Methods and Practice. London, UK: Thames & Hudson. Pg 249-53.

Click here to read more Quick Tip posts!


Quick Tips: Identifying Dental Diseases – The Basics.

Quick Tips: Identifying Dental Diseases – The Basics.

In a previous Quick Tip post we briefly touched on teeth in anthropology/archaeology by providing a basic answer to the question, “What can an anthropologist tell from the examination of teeth?”, which can be found by clicking here.

“No structures of the human body are more likely to disintegrate during life than teeth, yet after death none have greater tenacity against decay” – Wells, 1964.

Teeth are the hardest and most chemically stable tissues in the body; because of this, they’re sometimes the only part of a skeletal remain to withstand the excavation. Even though teeth are the most robust structures of a skeleton, there are numerous diseases that can affect them. This is due to teeth interacting directly with the environment and therefore are vulnerable to damage from physical and biological influences. It is from these diseases, that archaeologists and anthropologists can learn a wealth of information on an individual or population’s diet, oral hygiene, dental care and occupation.

Lukacs, 1989, classified dental diseases into four categories, which are;

  • Infectious – This is one of the more common disease types found within archaeological populations. An example of an infectious dental disease is caries.
  • Degenerative – This is where the dental disease occurs over time as the person ages. An example of degenerative dental disease includes recession of the jaw bone.
  • Developmental –These dental diseases develop due to environmental and lifestyle factors, such as malnutrition. An example of this type of disease is enamel hypoplasia.
  • Genetic – These types of diseases are caused by genetic anomalies.

The main dental diseases that are observed within an archaeological or anthropological context are;

If the dental disease listed above is a link, it means that I have already covered it in an individual blog post and can be found by following the link.

Each of these dental diseases has their own characteristics which allows them to be easily distinguished from one and another. In the next few posts of this Quick Tips series, we will be focusing on each dental disease individually, and highlighting their aetiology and physical characteristics.

References:

Buikstra, J.E., Ubelaker, D.H. 1994. Standards for Data Collection From Human Skeletal Remains. Fayetteville, Arkansas: Arkansas Archaeological Survey Report Number 44.

Lukacs, J.R. 1989. Dental paleopathology: methods for reconstructing dietary patterns. In M.Y. Iscan and K.A.R. Kennedy (eds), Reconstruction of life from the skeleton. New York, Alan Liss. Pg 261-86.

Ubelaker, D.H. 1989. Human Skeletal Remains: Excavation, Analysis, Interpretation (2nd Ed.). Washington, DC: Taraxacum.

Wells, C. 1964. Bones, bodies and disease. London, Thames and Hudson.

White, T.D., Folkens, P.A. 2005. The Human Bone Manual. San Diego, CA: Academic Press. Pg 392-398.

This is the first post of the Quick Tips series on identifying dental diseases. The next post in this series will focus on how to identify dental/enamel hypoplasia and highlight the cause of this dental disease.

To read more Quick Tips in the meantime, click here, or to learn about basic fracture types and their characteristics/origins click here!

Textbook of the Week: Human Remains in Archaeology: A Handbook.

Every week we highlight one archaeology/anthropology textbook from our suggested readings, a full list of our suggested resources can be found here, on our Useful Literature page.

HumanArch

Human Remains in Archaeology: A Handbook (CBA Practical Handbook) (UK/Europe Link)

Human Remains in Archaeology: a Handbook (Cba Practical Handbook) (US/Worldwide Link)
by Charlotte Roberts. Rating: ****

“This book is great for students to grasp and understand the importance of human remains in archaeological contexts. The book has a whole section dedicated to the numerous methods that are used . It is also a book from the CBA Practical Handbook series, so it has section on the laws/legal information which is really useful for Medico-Legal!
This author also wrote The Archaeology of Disease (UK) The Archaeology of Disease (Worldwide), which I think is also an anthropology essential!”

If you’re a student – check out our ‘Quick Tips’ posts where we breakdown topics of AAFS into bite-sized chunks. We’re currently covering how to age and how to estimate the biological sexof skeletal remains, and also how to identify a variety of fracture types

Image

3-Million Year Old Fossilised Metacarpals Show Evidence of Tool Use.

A recent study has put forward some important evidence of early human ancestors, in particular Australopithecus africanus, wielding tools in a human like fashion dating around 3 to 2-million years ago.

Figure 1: A recent study has put forward some important evidence of early human ancestors, in particular Australopithecus africanus (pictured), wielding tools in a human like fashion dating around 3 to 2-million years ago.

Figure 1: A recent study has put forward some important evidence of early human ancestors, in particular Australopithecus africanus (pictured), wielding tools in a human like fashion dating around 3 to 2-million years ago . ©Shaen Adey, Gallo Images/Corbis.

The study, led by Matthew Skinner from the University of Kent, compared the internal structures of the hand bones from the Australopithecus africanus and several Pleistocene hominins, which were previously considered to have not engaged in habitual tool use.

Skinner et al, found that they all have a human trabecular (spongy) bone pattern in the metacarpals, and this is consistent with the “forceful opposition of the thumb and fingers typically adopted during tool use”.

Top row: First metacarpals of the  various hominins.  Bottom row: 3-D renderings from the micro-CT scans showing a cross-section of the bone structure inside.

Figure 2: Top row: First metacarpals of the various hominids.
Bottom row: 3-D renderings from the micro-CT scans showing a cross-section of the bone structure inside. ©T.L. Kivell

The evolution of the hand, mainly the development of opposable thumbs, has been hailed as the key to success for early humans. It is thought that without the improvement of our grip and hand posture, tool technology could not have emerged and developed as well as it has.

This piece of research will provide a new discussion into when the first appearance of habitual tool use occurred in prehistory, as this study’s evidence of modern human-like tool use is dated 0.5-million years earlier than the first archaeological evidence of stone tools.

References:

Skinner, M. Stephens, N. Tsegai, Z. Foote, A. Nguyen, N. Gross, T. Pahr, D. Hublin, J. Kivell, T. 2015. Human-like hand use in Australopithecus africanusScience. 347, 6220. p395-399.
You can view this paper by clicking here.


If you’re a student – check out our ‘Quick Tips’ posts where we breakdown topics of AAFS into bite-sized chunks. We’re currently covering how to age and how to estimate the biological sex of skeletal remains, and also how to identify a variety of fracture types

Quick Tips: How to Estimate the Biological Sex of a Human Skeleton – Pelvic Dimorphism.

This is the 3rd blog post in this Quick Tips series on estimating the biological sex of human skeletal remains. If you haven’t read the first post on the basics of sexing skeletal remains, click here to start at the beginning or if you skipped the 2nd post focusing on the skull method if sex estimation, click here.

When it comes to sexing skeletal remains by the pelvic elements there are a few trends, as stated in the first blog post in this series, the female pelvic bones, specifically the sacra and ossa coxa are smaller and less robust than their male counterparts.

Figure 1: Side by side size comparison of a male (left) and female (right) pelvis.

Figure 1: Side by side size comparison of a male (left) and female (right) pelvis.

Although the female pelvic components are smaller in general, many aspects of the female pelvis are wider than males. The pelvic inlets on a female are relatively wider than those of males, as well as the greater sciatic notches – which is thought to aid childbirth.

Figure 2: Basic annotated diagram of the pelvis.

Figure 2: Basic labelled diagram of the pelvic anatomy.

There are numerous features of the pelvic bones that are examined to identify the biological sex of an individual, alongside the trends stated about. These features are as follows;

  • The ventral arc.
  • The subpubic concavity.
  • The medial aspect of the ischiopubic ramus.
  • The greater sciatic notch.

The first three features listed above, are known as the Phenice method – which was proposed by T. W. Phenice in 1969. His paper, “A Newly Developed Visual Method of Sexing the Os Pubis”, contributed greatly to the method of visual determination of sex, as beforehand the methods were subjective and based largely on the osteologist’s experience. The Phenice method should only be used for fully adult skeletal remains, where it is 96 to 100% accurate.

The ventral arc is a slightly raised ridge of bone that sweeps inferiorly and laterally across the central surface of the pubis. It joins with the medial border of the ischiopubic ramus. The ventral arc is only present in females, although males may have raised ridges in this area, but these do not take the wide, evenly arching appearance of the ventral arc.

Figure 2: The ventral arc is characterised by a slightly raised ridge of bone. Males do not exhibit the ventral arc, where as females do.

Figure 3: The ventral arc is characterised by a slightly raised ridge of bone. Males (left) do not exhibit the ventral arc, where as females (right) do.

To observe the subpubic concavity, you should turn the pubis so that the convex dorsal surface if facing you. Then you should view the medial edge of the ischiopubic ramus. Females display a subpubic concavity here where the edge of the ramus is concaved, whereas males tend to have straight edges or very slightly concaved.

Figure 4: Females display a subpubic concavity here where the edge of the ramus is concaved, whereas males tend to have straight edges or very slightly concaved.

Figure 4: Females (right) display a subpubic concavity here where the edge of the ramus is concaved, whereas males (left) tend to have straight edges or very slightly concaved.

To observe the medial aspect of the ischiopubic ramus, you should turn the pubis 90° so that the symphyseal surface is directly facing you. View the part of the ramus that is directly inferior to the pubis symphysis. In females, the ramus has a sharp, narrow edge, whereas in males it is flat and blunt.

Figure 5: In females (right), the medial aspect of the ischiopubic ramus has a sharp, narrow edge, whereas in males (left) it is flat and blunt.

Figure 5: In females (right), the medial aspect of the ischiopubic ramus has a sharp, narrow edge, whereas in males (left) it is flat and blunt.

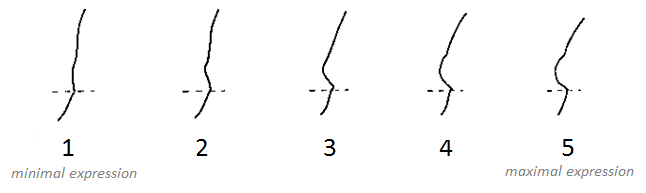
As with the five features of the skull used to sex a skeleton in the previous, the greater sciatic notch has also been given a numerical score from 1 to 5 relating to the level of expression. It has been generally found that female os coxae are more likely to exhibit a lower level of expression, whereas male os coxae are more likely to have higher levels of expression.

Figure 6:

Figure 6: It has been generally found that female os coxae are more likely to exhibit a lower level of expression, whereas male os coxae are more likely to have higher levels of expression, when it comes to the greater sciatic notch.

To obtain the best results whist examining the os coxae, it should be held in the same orientation as the pictured above. This allows you to match the angle of the greater sciatic to the closest expression that represents it. It should be noted that this method is usually used as a secondary indicator.

References:

Buikstra, J.E., Ubelaker, D.H. 1994. Standards for Data Collection From Human Skeletal Remains. Fayetteville, Arkansas: Arkansas Archaeological Survey Report Number 44.

Ubelaker, D.H. 1989. Human Skeletal Remains: Excavation, Analysis, Interpretation (2nd Ed.). Washington, DC: Taraxacum.

White, T.D., Folkens, P.A. 2005. The Human Bone Manual. San Diego, CA: Academic Press. Pg 392-398.

This is the third post of the Quick Tips series on sex determination of skeletal remains. The next post in this series will focus on the use of DNA to determine biological sex. To read more Quick Tips in the meantime, click here

Textbook of the Week: Human Bone Manual.

Every week we highlight one archaeology/anthropology textbook from our suggested readings, a full list of our suggested resources can be found here, on our Useful Literature page.

51ND3YE08ZL

The Human Bone Manual (UK/Europe)
The Human Bone Manual (US/Worldwide Link)
by Tim D. White and Pieter A. Folkens.  Rating: *****

“I cannot stress how important this book is to have. It is the ‘go-to’ guide on anything relating to bones and skeletal remains. It’s illustrated as well, so if your course isn’t too hands on – you will still understand what the book is talking about from the detailed pictures. It’s a must for any budding anthropologist, and one of my favourite books to read. It’s a good size and concise so its pretty much a ‘pocket book’ that you can always carry in your book bag.”

If you’re a student – check out our ‘Quick Tips’ posts where we breakdown topics of AAFS into bite-sized chunks. We’re currently covering how to age and how to estimate the biological sex of skeletal remains, and also how to identify a variety of fracture types!  We’re also taking the time to answer the ‘Common Questions’ that get asked about these disciplines, as well as simplifying a multitude of archaeological techniques to make your learning easier.

Nine-ton Block of Sandstone Unveils Six Utahraptor Remains.

Archaeologists in Moab, Utah, have discovered the remains of six Utahraptors within a nine-ton block of sandstone. This discovery is regarded as the biggest fossil find ever of the Utahraptor, a giant predatory theropod dinosaur who roamed the earth during the early Cretaceous period. The massive excavation, led by Utah state palaeontologist James Kirkland, has been undertaken over the past decade upon the Utah Mountain.

The nine-ton sandstone block revealed the skeletal remains of a 16ft-long adult, four juveniles and a baby Utahraptor which was approximately 3ft long from snout to tail.

The nine-ton sandstone block revealed the skeletal remains of a 16ft-long adult, four juveniles and a baby Utahraptor which was approximately 3ft long from snout to tail.

The sandstone block revealed the skeletal remains of a 16ft-long adult, four juveniles and a baby Utahraptor which was approximately 3ft long from snout to tail. The block also revealed bones belonging to a beaked, bipedal herbivore known as an Iguanadon. It is hoped that the Utahraptors died whilst hunting as a group, which may provide evidence of pack hunting. Another hypothesis claims that the Utahraptors may have wandered into quicksand and died at different times, due to the fossils being stacked 3ft thick.

It is hoped that the Utahraptors died whilst hunting as a group, which may provide evidence of pack hunting.

It is hoped that the Utahraptors died whilst hunting as a group, which may provide evidence of pack hunting.

Kirkland thinks that the Utahraptors were enticed by the promise of the unwary Iguanodon which stumbled into the quicksand itself. Unable to move, bellowing and struggling, the trapped Iguanodon lured the Utahraptors who then, one after another, tried to ‘nab an easy meal’ only ending up stuck and meeting the same fate as the Iguanodon.

Utahraptors are the largest known member of the family Dromaeosauridae, with some specimens reaching 23ft-long weighing around 500kg. They bare a resemblance to their ‘cousins’ – the Velociraptor but are covered in feathers, with a sickle like claw on each of their second toes.

Size comparison of an average sized adult Utahraptor with an adult male human (5.9ft).

Size comparison of an average sized adult Utahraptor with an adult male human (5.9ft).

200-Million-Year-Old Ichthyosaur Complete Fossil Discovered.

An ichthyosaur fossil, dating back to around 200 million years, has been discovered on a beach in Penarth, South Wales.

The 7ft fossil, weighing in at 132lbs, was unearthed on a beach in Penarth, South Wales.

The 7ft fossil, weighing in at 132lbs, was unearthed on a beach in Penarth, South Wales.

The 7ft fossil, weighing in at 132lbs, was unearthed by beach walker Jonathan Bow, who spent a whole day excavating it. Cindy Howells, a palaeontologist from the National Museum of Wales said: ‘The ichthyosaur is potentially a very, very important find because it is so complete.’

Ichthyosaur Fossil 3

Ichthyosaur Fossil 2-Head

Ichthyosaurs are commonly referred to as fish lizards, but are in fact large carnivorous marine reptiles varying from 3ft to 52ft in length. They thrived during the Mesozoic era, and are thought to have made their first appearance around 250 million years ago.

It is thought that the ichthyosaur population increased during the later Triassic and early Jurassic Period, but then became replaced by the plesiosaurs during the later Jurassic and Cretaceous Period. By the Late Cretaceous period, ichthyosaurs became extinct.

Ichthyosaurs are commonly referred to as fish lizards, but are in fact large carnivorous marine that thrived during the Mesozoic era.

Ichthyosaurs are commonly referred to as fish lizards, but are in fact large carnivorous marine that thrived during the Mesozoic era.

Quick Tips: How To Estimate The Biological Sex Of A Human Skeleton – Skull Method.

This is the 2nd blog post in this Quick Tips series on estimating the biological sex of human skeletal remains. If you haven’t read the first post on the basics of sexing skeletal remains, click here to start at the beginning.

One of the most widely used methods of sexing skeletal remains is by examining the skull. The skull has five different features that are observed and scored.  The five features are the:

Markers together

Each of these markers is given a numerical score from 1 to 5 relating to the level of expression, with 1 being minimal expression and 5 being maximal expression. Each feature should be scored independently, and without influence from the other identifying features. It has been generally found that female skulls are more likely to have a lower level of expression in all features, whereas male skulls are more likely to have higher levels of expression.

To observe the nuchal crest, one should view the skull from its lateral profile and feel for the smoothness (1-minimal expression) or ruggedness (5-maximal expression) of the occipital surface, and compare it with the scoring system of that feature (Figure 1).

The scoring system for expression levels in the nuchal crest.

Figure 1: The scoring system for expression levels in the nuchal crest.

To observe the mastoid process, one should view the skull from its lateral profile and compare its size and volume, not its length, with other features of the skull such as the zygomatic process of the temporal lobe and external auditory meatus. Visually compare its size with the scoring system of that feature (Figure 2). If the mastoid process only descend or projects only a small distance then it should be scored a 1 (minimal expression), where as if it is several times the width and length of the external auditory meatus, then it should be scored as a 5 (maximal expression).

Figure 2: The scoring system for the size and volume of the mastoid process.

Figure 2: The scoring system for the expression levels of the mastoid process.

To observe the supraorbital margin, one should view the skull at it’s lateral profile and place their finger against the margin of the orbit and hold the edge to determine it’s thickness. If the edge feels ‘extremely sharp’ then it would score a 1minimal expression, if it felt rounded and thick as a pencil it would score a 5maximal expression (Figure 3).

Supraorbital Margin

Figure 3: The scoring system for the expression levels of the supraorbital margin.

To observe the supraorbital ridge, one should view the skull from it’s profile and view the prominence of the supraorbital ridge. If the ridge is smooth with little or no projection, then it would score a 1minimal expression, if it is pronounced and forms a rounded ‘loaf-shaped’ ridge then it would score a 5maximal expression (Figure 4).

Supraorbital Ridge - Glabella

Figure 4: The scoring system for the expression levels of the supraorbital ridge.

To observe the mental eminence, one should view the skull front facing, and hold the mandible between the thumbs and index fingers, with the thumbs placed either side of the mental eminence. If there is little or no projection of the mental eminence, then it would score a 1minimal expression, if it is pronounced it would score a 5maximal expression (Figure 5).

Mental Eminence

Figure 5: The scoring system for the expression levels of the mental eminence.

References:

Buikstra, J.E., Ubelaker, D.H. 1994. Standards for Data Collection From Human Skeletal Remains. Fayetteville, Arkansas: Arkansas Archaeological Survey Report Number 44.

Ubelaker, D.H. 1989. Human Skeletal Remains: Excavation, Analysis, Interpretation (2nd Ed.). Washington, DC: Taraxacum.

White, T.D., Folkens, P.A. 2005. The Human Bone Manual. San Diego, CA: Academic Press. Pg 360-385.

This is the second post of the Quick Tips series on sex determination of skeletal remains. The next post in this series will focus on the use of the pelvis and parturition scars to determine biological sex. To read more Quick Tips in the meantime, click here

On Location: Durotriges Project, 2014 – Roman Burials.

Header

Today’s On Location is featuring the Durotriges Project, an excavation in Winterborne Kingston,  Dorset, UK, which is held by Bournemouth University.

This archaeological site shows significant Iron Age and Roman settlement, particularly with the Durotriges tribe and Roman interaction. The Durotriges Project has been a yearly excavation, starting in 2009, which has uncovered many archaeological features. Over the past five years, the site has unearthed an Iron Age banjo enclosure, two Roman villas, an Iron Age burial site and numerous storage pits.

During this years excavation they were able to uncover a Bronze Age food preparation area surrounded by storage pits, and a flint mine – which was used to source the materials needed to construct the settlement’s buildings. Within the flint mine, students discovered the skeletal remains of an 18 month old juvenile.

Food Prep area DBD2014

The Bronze Age food preparation area, defined by post holes with a hearth in the centre, that was discovered during the Durotriges Project 2014. A storage pit can be seen to the right.

photo 3

The flint mine that was discovered in Trench 2. Within this flint mine, students unearthed the skeletal remains of an 18 month old juvenile.

The Durotriges Project recently hit the news this year with its discovery of five Roman burials. The burials, thought to date between 350AD to 380AD, were uncovered within a 15 by 15m  square enclosure around 100m away from the previously found Roman villa.

Roman Burials Within Enclosure

The five Roman era burials, dated between 350AD and 380AD, which were discovered within a square enclosure.

The skeletal remains found within the five graves have been identified as two males and three females. The males and two females have been aged between 40-50 years old, and the other female aged between 80-90 years old. The individuals were buried within coffins, with evidence of them being clothed as eyelets from their shoes were discovered.

Skeleton

One of the five Roman burials uncovered by the Durotriges Project.

It is thought that they were of “high status” as were buried with great care and with burial gifts. It is hoped that the individuals were the occupants of the nearby Roman villa, and that their discovery will help shed light about the Roman’s diet, heath and ancestry.

To learn more about Bournemouth University’s Durotriges Project’s other fascinating discoveries from the site, you can view their blog here. Follow them on Twitter, and keep up to date with them by liking their Facebook page!