Quick Tips: Archaeological Techniques –Use of Isotopes in Archaeology.

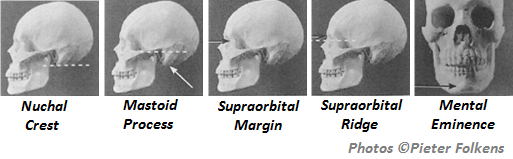
Isotopic analysis is widely used within the worlds of archaeology and anthropology. From analysing isotopes we’re able to uncover a wide range of information regarding the past; ranging from palaeoenvironments to palaeodiets, and even using isotopes to reconstruct trade routes of materials.

But first, what are isotopes?

All of the chemical elements consist of atoms which are specific to the element and the mass of an atom is dictated by the number of protons and neutrons it contains. The identity of the chemical element depends on the number of protons found within the atom’s nucleus, but the number of neutrons within the atom can vary. Atoms of the same chemical element (same number of protons), but with different masses, which is from the varying amount of neutrons, are called isotopes.

Stone Circle at Drombeg

Within nature, most of the elements consist of a number of isotopes. These isotopes can be found within water, livestock, crops and plants, which can then be used to reconstruct palaeodiets and palaeoenvironments.

Within nature, most of the elements consist of a number of isotopes. For a great majority of elements these relative proportions of isotopes are fixed, but there are a group of elements which either due to chemical or biochemical processes are of variable isotopic composition. These elements are oxygen, carbon, nitrogen and sulphur. Another group of isotopes that are used for analysis are strontium, lead and neodymium. These are formed by elements which contain stable but radiogenic isotopes, which are formed by radioactive decay of another element. Carbon and nitrogen isotope composition are primarily used to reconstruct diets, and oxygen isotopes are used to determine geographic origin. Strontium and lead isotopes found within teeth and bone can sometimes be used to reconstruct migration patterns in human populations and cultural affinity

Isotopes Table

A table of the various elemental isotopes that are valuable in archaeological and anthropological research.

But how do isotopes get into skeletal remains?

Carbon isotopes are taken up through the diet of animals during their lifetime and these isotopes are deposited into teeth and bones of humans when they are consumed and digested. By studying animal bones and examining the 12C and 13C isotope ratio, it is possible to determine whether the animals ate predominately 3C or 4C plants. Oxygen isotopes are constantly being taken up and deposited into the body through the water a population drinks. This process ends with the organism’s death, from this point on isotopes no longer accumulate in the body, but do undergo degradation. For best result the researcher would need to know the original levels, or estimation thereof, of isotopes in the organism at the time of its death.

By creating a map of these natural occurring isotopes in different environments, rivers and areas, it is possible to identify where in an area the population lived, sourced their water or where the livestock grazed, by comparing the levels of isotopes that were obtained from skeletal remains to the environmental map. This mapping can also help identify trade routes that once existed and can also identify the migration patterns of populations.

References:

Balme, J., Paterson, A. 2006. Archaeology in Practice: A Student Guide to Archaeological Analayses. Oxford, UK: Blackwell Publishing. Pg 218.

Renfrew, C., Bahn, P. 1991. Archaeology: Theories, Methods and Practice. London, UK: Thames & Hudson. Pg 249-53.

If you’re new to the realm of archaeological, anthropological and forensic sciences (AAFS), or are a student needing sturdy and reliable references, or wondering “what archaeology or anthropology textbooks to buy? Check out our new ‘Useful Literature’ page!

Textbook of the Week: Concise Oxford Dictionary of Archaeology.

Every week we highlight one archaeology/anthropology textbook from our suggested readings, a full list of our suggested resources can be found here, on our Useful Literature page.

51uiSHk+esL._SY344_BO1,204,203,200_

Concise Oxford Dictionary of Archaeology (UK/Europe Link)
Concise Oxford Dictionary of Archaeology  (US/Worldwide Link)
by Timothy Darvill. Rating: *****

“Does exactly as the title says – it is very concise, making it handy to have for your written assignments or dissertations, especially when you’re having trouble with interpretations of archaeological features! It is also useful to decipher what is being said within published papers by breaking down the archaeological jargon into layman terms if you’re a beginner!

If you’re a student – check out our ‘Quick Tips’ posts where we breakdown topics of AAFS into bite-sized chunks. We’re currently covering how to age and how to estimate the biological sex of skeletal remains, and also how to identify dental diseases!

Quick Tips: Identifying Dental Diseases – Dental Caries.  

Quick Tips: Identifying Dental Diseases – Dental Caries.  

In our previous Quick Tip post on identifying dental diseases, we gave a basic overview on the disease dental/enamel hypoplasia. If you haven’t read it, you can find it by clicking here.

Dental caries, also known as tooth decay, is thought to be the most common of dental diseases. This is due to it being recorded within archaeological populations more frequently than other dental diseases. It is an infectious and spreadable disease, which is the result of the fermentation of carbohydrates by bacteria that are present within teeth plaque. Its appearance can sometimes be observed as small opaque spots on the crowns of teeth, to large gaping cavities.

dental caries

Dental caries appearance can sometimes be observed as small opaque spots on the crowns of teeth, to large gaping cavities.

Dental caries occurs when sugars from the diet, particularly sucrose, are fermented by the bacteria Lactobacilus acidophilus and Streptococcys mutans, which are found within the built up plaque. This fermentation process causes acids to be produced, which in turn break down and demineralises teeth leaving behind cavities.

Powell (1985) divided the causes of dental caries into different areas, which are;

  • Environmental factors, the trace elements in food and water (i.e fluoride in water sources may protect against caries).
  • Pathogenic factors, the bacterial causing the disease.
  • Exogenous factors, from diet and oral hygiene.
  • Endogenous factors, the shape and structure of teeth.

Any part of the tooth structure that allows the accumulation of plaque and food debris can be susceptible to caries. This means that the crowns of the tooth (especially with molars and premolars due to the fissures), and the roots of the teeth are the areas most commonly affected by dental caries.

References:

Lukacs, J.R. 1989. Dental paleopathology: methods for reconstructing dietary patterns. In M.Y. Iscan and K.A.R. Kennedy (eds), Reconstruction of life from the skeleton. New York, Alan Liss, pp. 261-86.

Powell, M.L. 1985. The analysis of dental wear and caries for dietary reconstruction. In R.I. Gilbert and J.H. Mielke (eds), Analysis of prehistoric diets. London, Academic Press, pp. 307-38.

Ubelaker, D.H. 1989. Human Skeletal Remains: Excavation, Analysis, Interpretation (2nd Ed.). Washington, DC: Taraxacum.

White, T.D., Folkens, P.A. 2005. The Human Bone Manual. San Diego, CA: Academic Press. Pg 392-398.

This is the second post of the Quick Tips series on identifying dental diseases. The next post in this series will focus on how to identify calculus (calcified plague), and highlight the cause of this dental disease. To read more Quick Tips in the meantime, click here.

If you’re new to the realm of archaeological, anthropological and forensic sciences (AAFS), or are a student needing sturdy and reliable references, or wondering “what archaeology or anthropology textbooks are good? Check out our new ‘Useful Literature’ page for suggestions from peers and professors!

Textbook of the Week: The Archaeology of Human Bones.

Every week we highlight one archaeology/anthropology textbook from our suggested readings, a full list of our suggested resources can be found here, on our Useful Literature page.

51RSbxmUriL._SY344_BO1,204,203,200_

The Archaeology of Human Bones (UK/Europe Link)
The Archaeology of Human Bones (US/Worldwide Link)
by Simon Mays. Rating: *****

“This text book is a amazing to use as a reference, as its very thorough. It’s not as easy to follow as Human Remains in Archaeology: A Handbook by Charlotte Roberts, but is perfect for anthropology and archaeology students who want to get a full grasp on the subject, and learn everything there is to know!

If you’re a student – check out our ‘Quick Tips’ posts where we breakdown topics of AAFS into bite-sized chunks. We’re currently covering how to age and how to estimate the biological sex of skeletal remains, and also how to identify dental diseases!

Quick Tips: Identifying Dental Diseases – Dental/Enamel Hypoplasia.

In our previous Quick Tip post on identifying dental diseases, we gave a basic overview on the different diseases that are observed. If you haven’t read it, you can find it by clicking here.

Dental hypoplasia is a condition that affects the enamel of a tooth. It is characterised by pits, grooves and transverse lines which are visible on the surface of tooth crowns. The lines, grooves and pits that are observed are defects in the enamels development. These defects occur when the enamel formation, also known as amelogenesis, is disturbed by a temporary stress to the organism which upsets the ameloblastic activity. Factors which can cause such stress and therefore disrupt the amelogenesis include; fever, malnutrition, and hypocalcemia.

Figure 1: An example of linear enamel hypoplasia.

Figure 1: An example of linear enamel hypoplasia.

It has been noted that enamel hypoplasia is more regularly seen on anterior teeth than on molars or premolars, and that the middle and cervical portions of enamel crowns tend to show more defects than the incisal third. This is due to the amelogenesis beginning at the occlusal apex of each tooth crown and proceeding rootward, towards where the crown then meets the root at the cervicoenamel line.

Figure 2: Anatomy of a tooth. Note the top third is known as either the occlusal third if in molars, or the incisal third when the tooth is an incisor or canine.

Figure 2: Anatomy of a tooth. Note the top third is known as either the occlusal third if in molars, or the incisal third when the tooth is an incisor or canine.

By studying these incidents of enamel hypoplasia within a population sample, we can be provided with valuable information regarding patterns of dietary stress and disease that may have occurred within the community.

References:

Lukacs, J.R. 1989. Dental paleopathology: methods for reconstructing dietary patterns. In M.Y. Iscan and K.A.R. Kennedy (eds), Reconstruction of life from the skeleton. New York, Alan Liss, pp. 261-86.

Ubelaker, D.H. 1989. Human Skeletal Remains: Excavation, Analysis, Interpretation (2nd Ed.). Washington, DC: Taraxacum.

White, T.D., Folkens, P.A. 2005. The Human Bone Manual. San Diego, CA: Academic Press. Pg 392-398.

This is the second post of the Quick Tips series on identifying dental diseases. The next post in this series will focus on how to identify dental caries and highlight the cause of this dental disease.

To read more Quick Tips in the meantime click here, or to learn about basic fracture types and their characteristics/origins click here!

Textbook of the Week: Forensic Archaeology Advances in Theory and Practice.

Every week we highlight one archaeology/anthropology textbook from our suggested readings, a full list of our suggested resources can be found here, on our Useful Literature page.

5191V5QW55L._SY344_BO1,204,203,200_

Forensic Archaeology Advances in Theory and Practice (UK/Europe Link)
Forensic Archaeology Advances in Theory and Practice (US/Worldwide Link)
by John Hunter & Margaret Cox. Rating: ****

“This text book is easy to follow, so perfect for beginners or first year students. It uses numerous case studies and illustrations to show you how to apply it in practice, meaning that you can fully grasp what situation to use it in and how to correctly apply it.

If you’re a student – check out our ‘Quick Tips’ posts where we breakdown topics of AAFS into bite-sized chunks. We’re currently covering how to age and how to estimate the biological sex of skeletal remains, and also how to identify dental diseases!

Quick Tips: Identifying Dental Diseases – The Basics.

Quick Tips: Identifying Dental Diseases – The Basics.

In a previous Quick Tip post we briefly touched on teeth in anthropology/archaeology by providing a basic answer to the question, “What can an anthropologist tell from the examination of teeth?”, which can be found by clicking here.

“No structures of the human body are more likely to disintegrate during life than teeth, yet after death none have greater tenacity against decay” – Wells, 1964.

Teeth are the hardest and most chemically stable tissues in the body; because of this, they’re sometimes the only part of a skeletal remain to withstand the excavation. Even though teeth are the most robust structures of a skeleton, there are numerous diseases that can affect them. This is due to teeth interacting directly with the environment and therefore are vulnerable to damage from physical and biological influences. It is from these diseases, that archaeologists and anthropologists can learn a wealth of information on an individual or population’s diet, oral hygiene, dental care and occupation.

Lukacs, 1989, classified dental diseases into four categories, which are;

  • Infectious – This is one of the more common disease types found within archaeological populations. An example of an infectious dental disease is caries.
  • Degenerative – This is where the dental disease occurs over time as the person ages. An example of degenerative dental disease includes recession of the jaw bone.
  • Developmental –These dental diseases develop due to environmental and lifestyle factors, such as malnutrition. An example of this type of disease is enamel hypoplasia.
  • Genetic – These types of diseases are caused by genetic anomalies.

The main dental diseases that are observed within an archaeological or anthropological context are;

If the dental disease listed above is a link, it means that I have already covered it in an individual blog post and can be found by following the link.

Each of these dental diseases has their own characteristics which allows them to be easily distinguished from one and another. In the next few posts of this Quick Tips series, we will be focusing on each dental disease individually, and highlighting their aetiology and physical characteristics.

References:

Buikstra, J.E., Ubelaker, D.H. 1994. Standards for Data Collection From Human Skeletal Remains. Fayetteville, Arkansas: Arkansas Archaeological Survey Report Number 44.

Lukacs, J.R. 1989. Dental paleopathology: methods for reconstructing dietary patterns. In M.Y. Iscan and K.A.R. Kennedy (eds), Reconstruction of life from the skeleton. New York, Alan Liss. Pg 261-86.

Ubelaker, D.H. 1989. Human Skeletal Remains: Excavation, Analysis, Interpretation (2nd Ed.). Washington, DC: Taraxacum.

Wells, C. 1964. Bones, bodies and disease. London, Thames and Hudson.

White, T.D., Folkens, P.A. 2005. The Human Bone Manual. San Diego, CA: Academic Press. Pg 392-398.

This is the first post of the Quick Tips series on identifying dental diseases. The next post in this series will focus on how to identify dental/enamel hypoplasia and highlight the cause of this dental disease.

To read more Quick Tips in the meantime, click here, or to learn about basic fracture types and their characteristics/origins click here!

3-Million Year Old Fossilised Metacarpals Show Evidence of Tool Use.

A recent study has put forward some important evidence of early human ancestors, in particular Australopithecus africanus, wielding tools in a human like fashion dating around 3 to 2-million years ago.

Figure 1: A recent study has put forward some important evidence of early human ancestors, in particular Australopithecus africanus (pictured), wielding tools in a human like fashion dating around 3 to 2-million years ago.

Figure 1: A recent study has put forward some important evidence of early human ancestors, in particular Australopithecus africanus (pictured), wielding tools in a human like fashion dating around 3 to 2-million years ago . ©Shaen Adey, Gallo Images/Corbis.

The study, led by Matthew Skinner from the University of Kent, compared the internal structures of the hand bones from the Australopithecus africanus and several Pleistocene hominins, which were previously considered to have not engaged in habitual tool use.

Skinner et al, found that they all have a human trabecular (spongy) bone pattern in the metacarpals, and this is consistent with the “forceful opposition of the thumb and fingers typically adopted during tool use”.

Top row: First metacarpals of the  various hominins.  Bottom row: 3-D renderings from the micro-CT scans showing a cross-section of the bone structure inside.

Figure 2: Top row: First metacarpals of the various hominids.
Bottom row: 3-D renderings from the micro-CT scans showing a cross-section of the bone structure inside. ©T.L. Kivell

The evolution of the hand, mainly the development of opposable thumbs, has been hailed as the key to success for early humans. It is thought that without the improvement of our grip and hand posture, tool technology could not have emerged and developed as well as it has.

This piece of research will provide a new discussion into when the first appearance of habitual tool use occurred in prehistory, as this study’s evidence of modern human-like tool use is dated 0.5-million years earlier than the first archaeological evidence of stone tools.

References:

Skinner, M. Stephens, N. Tsegai, Z. Foote, A. Nguyen, N. Gross, T. Pahr, D. Hublin, J. Kivell, T. 2015. Human-like hand use in Australopithecus africanusScience. 347, 6220. p395-399.
You can view this paper by clicking here.


If you’re a student – check out our ‘Quick Tips’ posts where we breakdown topics of AAFS into bite-sized chunks. We’re currently covering how to age and how to estimate the biological sex of skeletal remains, and also how to identify a variety of fracture types

Quick Tips: How to Estimate the Biological Sex of a Human Skeleton – Pelvic Dimorphism.

This is the 3rd blog post in this Quick Tips series on estimating the biological sex of human skeletal remains. If you haven’t read the first post on the basics of sexing skeletal remains, click here to start at the beginning or if you skipped the 2nd post focusing on the skull method if sex estimation, click here.

When it comes to sexing skeletal remains by the pelvic elements there are a few trends, as stated in the first blog post in this series, the female pelvic bones, specifically the sacra and ossa coxa are smaller and less robust than their male counterparts.

Figure 1: Side by side size comparison of a male (left) and female (right) pelvis.

Figure 1: Side by side size comparison of a male (left) and female (right) pelvis.

Although the female pelvic components are smaller in general, many aspects of the female pelvis are wider than males. The pelvic inlets on a female are relatively wider than those of males, as well as the greater sciatic notches – which is thought to aid childbirth.

Figure 2: Basic annotated diagram of the pelvis.

Figure 2: Basic labelled diagram of the pelvic anatomy.

There are numerous features of the pelvic bones that are examined to identify the biological sex of an individual, alongside the trends stated about. These features are as follows;

  • The ventral arc.
  • The subpubic concavity.
  • The medial aspect of the ischiopubic ramus.
  • The greater sciatic notch.

The first three features listed above, are known as the Phenice method – which was proposed by T. W. Phenice in 1969. His paper, “A Newly Developed Visual Method of Sexing the Os Pubis”, contributed greatly to the method of visual determination of sex, as beforehand the methods were subjective and based largely on the osteologist’s experience. The Phenice method should only be used for fully adult skeletal remains, where it is 96 to 100% accurate.

The ventral arc is a slightly raised ridge of bone that sweeps inferiorly and laterally across the central surface of the pubis. It joins with the medial border of the ischiopubic ramus. The ventral arc is only present in females, although males may have raised ridges in this area, but these do not take the wide, evenly arching appearance of the ventral arc.

Figure 2: The ventral arc is characterised by a slightly raised ridge of bone. Males do not exhibit the ventral arc, where as females do.

Figure 3: The ventral arc is characterised by a slightly raised ridge of bone. Males (left) do not exhibit the ventral arc, where as females (right) do.

To observe the subpubic concavity, you should turn the pubis so that the convex dorsal surface if facing you. Then you should view the medial edge of the ischiopubic ramus. Females display a subpubic concavity here where the edge of the ramus is concaved, whereas males tend to have straight edges or very slightly concaved.

Figure 4: Females display a subpubic concavity here where the edge of the ramus is concaved, whereas males tend to have straight edges or very slightly concaved.

Figure 4: Females (right) display a subpubic concavity here where the edge of the ramus is concaved, whereas males (left) tend to have straight edges or very slightly concaved.

To observe the medial aspect of the ischiopubic ramus, you should turn the pubis 90° so that the symphyseal surface is directly facing you. View the part of the ramus that is directly inferior to the pubis symphysis. In females, the ramus has a sharp, narrow edge, whereas in males it is flat and blunt.

Figure 5: In females (right), the medial aspect of the ischiopubic ramus has a sharp, narrow edge, whereas in males (left) it is flat and blunt.

Figure 5: In females (right), the medial aspect of the ischiopubic ramus has a sharp, narrow edge, whereas in males (left) it is flat and blunt.

As with the five features of the skull used to sex a skeleton in the previous, the greater sciatic notch has also been given a numerical score from 1 to 5 relating to the level of expression. It has been generally found that female os coxae are more likely to exhibit a lower level of expression, whereas male os coxae are more likely to have higher levels of expression.

Figure 6:

Figure 6: It has been generally found that female os coxae are more likely to exhibit a lower level of expression, whereas male os coxae are more likely to have higher levels of expression, when it comes to the greater sciatic notch.

To obtain the best results whist examining the os coxae, it should be held in the same orientation as the pictured above. This allows you to match the angle of the greater sciatic to the closest expression that represents it. It should be noted that this method is usually used as a secondary indicator.

References:

Buikstra, J.E., Ubelaker, D.H. 1994. Standards for Data Collection From Human Skeletal Remains. Fayetteville, Arkansas: Arkansas Archaeological Survey Report Number 44.

Ubelaker, D.H. 1989. Human Skeletal Remains: Excavation, Analysis, Interpretation (2nd Ed.). Washington, DC: Taraxacum.

White, T.D., Folkens, P.A. 2005. The Human Bone Manual. San Diego, CA: Academic Press. Pg 392-398.

This is the third post of the Quick Tips series on sex determination of skeletal remains. The next post in this series will focus on the use of DNA to determine biological sex. To read more Quick Tips in the meantime, click here

Quick Tips: How To Estimate The Biological Sex Of A Human Skeleton – Skull Method.

This is the 2nd blog post in this Quick Tips series on estimating the biological sex of human skeletal remains. If you haven’t read the first post on the basics of sexing skeletal remains, click here to start at the beginning.

One of the most widely used methods of sexing skeletal remains is by examining the skull. The skull has five different features that are observed and scored.  The five features are the:

Markers together

Each of these markers is given a numerical score from 1 to 5 relating to the level of expression, with 1 being minimal expression and 5 being maximal expression. Each feature should be scored independently, and without influence from the other identifying features. It has been generally found that female skulls are more likely to have a lower level of expression in all features, whereas male skulls are more likely to have higher levels of expression.

To observe the nuchal crest, one should view the skull from its lateral profile and feel for the smoothness (1-minimal expression) or ruggedness (5-maximal expression) of the occipital surface, and compare it with the scoring system of that feature (Figure 1).

The scoring system for expression levels in the nuchal crest.

Figure 1: The scoring system for expression levels in the nuchal crest.

To observe the mastoid process, one should view the skull from its lateral profile and compare its size and volume, not its length, with other features of the skull such as the zygomatic process of the temporal lobe and external auditory meatus. Visually compare its size with the scoring system of that feature (Figure 2). If the mastoid process only descend or projects only a small distance then it should be scored a 1 (minimal expression), where as if it is several times the width and length of the external auditory meatus, then it should be scored as a 5 (maximal expression).

Figure 2: The scoring system for the size and volume of the mastoid process.

Figure 2: The scoring system for the expression levels of the mastoid process.

To observe the supraorbital margin, one should view the skull at it’s lateral profile and place their finger against the margin of the orbit and hold the edge to determine it’s thickness. If the edge feels ‘extremely sharp’ then it would score a 1minimal expression, if it felt rounded and thick as a pencil it would score a 5maximal expression (Figure 3).

Supraorbital Margin

Figure 3: The scoring system for the expression levels of the supraorbital margin.

To observe the supraorbital ridge, one should view the skull from it’s profile and view the prominence of the supraorbital ridge. If the ridge is smooth with little or no projection, then it would score a 1minimal expression, if it is pronounced and forms a rounded ‘loaf-shaped’ ridge then it would score a 5maximal expression (Figure 4).

Supraorbital Ridge - Glabella

Figure 4: The scoring system for the expression levels of the supraorbital ridge.

To observe the mental eminence, one should view the skull front facing, and hold the mandible between the thumbs and index fingers, with the thumbs placed either side of the mental eminence. If there is little or no projection of the mental eminence, then it would score a 1minimal expression, if it is pronounced it would score a 5maximal expression (Figure 5).

Mental Eminence

Figure 5: The scoring system for the expression levels of the mental eminence.

References:

Buikstra, J.E., Ubelaker, D.H. 1994. Standards for Data Collection From Human Skeletal Remains. Fayetteville, Arkansas: Arkansas Archaeological Survey Report Number 44.

Ubelaker, D.H. 1989. Human Skeletal Remains: Excavation, Analysis, Interpretation (2nd Ed.). Washington, DC: Taraxacum.

White, T.D., Folkens, P.A. 2005. The Human Bone Manual. San Diego, CA: Academic Press. Pg 360-385.

This is the second post of the Quick Tips series on sex determination of skeletal remains. The next post in this series will focus on the use of the pelvis and parturition scars to determine biological sex. To read more Quick Tips in the meantime, click here